Friday, December 28, 2012

Use Quartz Manager to monitor Quartz jobs inside Mule Studio

Now that we can successfully schedule jobs inside Mule Studio using Quartz, the next logical question is how we can monitor these jobs to know whether they executed or not, succeeded or failed? Mule does not provide monitoring at such a fine grained level. Luckily, Terracotta offers Mule Manager, as part of its Enterprise offering.

One of the key challenges we need to solve is to provide in-depth monitoring capability for our next generation platform. Currently we use cron to schedule some of recurring jobs. While cron is easily to setup, it provides no visibility into if and when the job was executed, the status of the job execution (success, fail, or still ongoing).

In this blog, we will show how to configure Mule Studio and Quartz connector so jobs can be monitored by Quartz manager.

From Terracotta's web site,

"Quartz Manager provides real-time monitoring and management for Quartz Scheduler. Use its rich graphical user interface to:
  • Gain immediate visibility into job schedules, status and activity
  • Readily add or modify scheduling information
  • Manage multiple instances of Quartz Scheduler through a single interface
  • Simplify ongoing management of job scheduling and execution
Quartz Manager is an enterprise-grade addition to Quartz Scheduler that comes with a commercial license and support."
We really like the facts that Quartz monitoring is JMX based and Quartz manager works with existing Quartz schedule w/o any configuration changes, other than enabling JMX support.

Here are the necessary steps to integrate Quartz end point with Quartz Manager.

Download and Install Quartz Manager

Follow the link to download and install Quartz Manager.

Enable JMX for Quartz Connector inside Mule Studio

Next we must enable JMX for both Quartz Connector and when we run the Mule flow.

Enable JMX for Quartz Connector

Enabling JMX for Quartz connector is accomplished through setting the following "quartz:factory-property" entries,
 <quartz:factory-property key="org.quartz.scheduler.jmx.export"  
                value="true" />  
 <quartz:factory-property key="org.quartz.scheduler.jmx.objectName"  
                value="quartz:type=QuartzScheduler,name=JmxScheduler,instanceId=NONE_CLUSTERED" />  

Replace org.quartz.scheduler.jmx.objectName's name and instanceId with one's own appropriate values.

Enable JMX Remoting when Running Mule Flow

Now we need to enable JMX remoting when running Mule Flow. Go to eclipse->Run->Run Configuration. Find the run configuration for the existing flow under "Mule Application". Add the following entries to VM arguments,
 -XX:PermSize=128M -XX:MaxPermSize=256M -Dcom.sun.management.jmxremote -Dcom.sun.management.jmxremote.port=1099 -Dcom.sun.management.jmxremote.ssl=false  

Upgrade Quartz JAR File in Mule Studio

Next we need to upgrade the quartz-all.jar file shipped with Mule Enterprise Studio. Currently Mule ships quartz-all-1.6.6.jar, which is very old and won't work with Quartz manager. We can't use the most recently release of Quartz as the most recent version breaks the backward compatibility and Mule won't support it. Download quartz-all-1.8.6.jar from Terrocatta's web site.

Go to MuleStudio installation directory and replace quartz-all-1.6.6.jar with quartz-all-1.8.6.jar.

We also need to fix the built-in Mule runtime libraries reference to quartz-all-1.6.6.jar with quartz-all-1.8.6.jar. Mule runtime dependency is defined in a MANIFEST.MF file under your Mule studio installation directory. Locate this file, replace quartz-all-1.6.6.jar with quartz-all-1.8.6.jar.

Start Mule Flow and Quartz Manager

Now we can start Mule Flow and Quartz Manager. 

When Quartz Manager first starts up, it asks for JMX host and port number,

Enter the correct host name and port number.

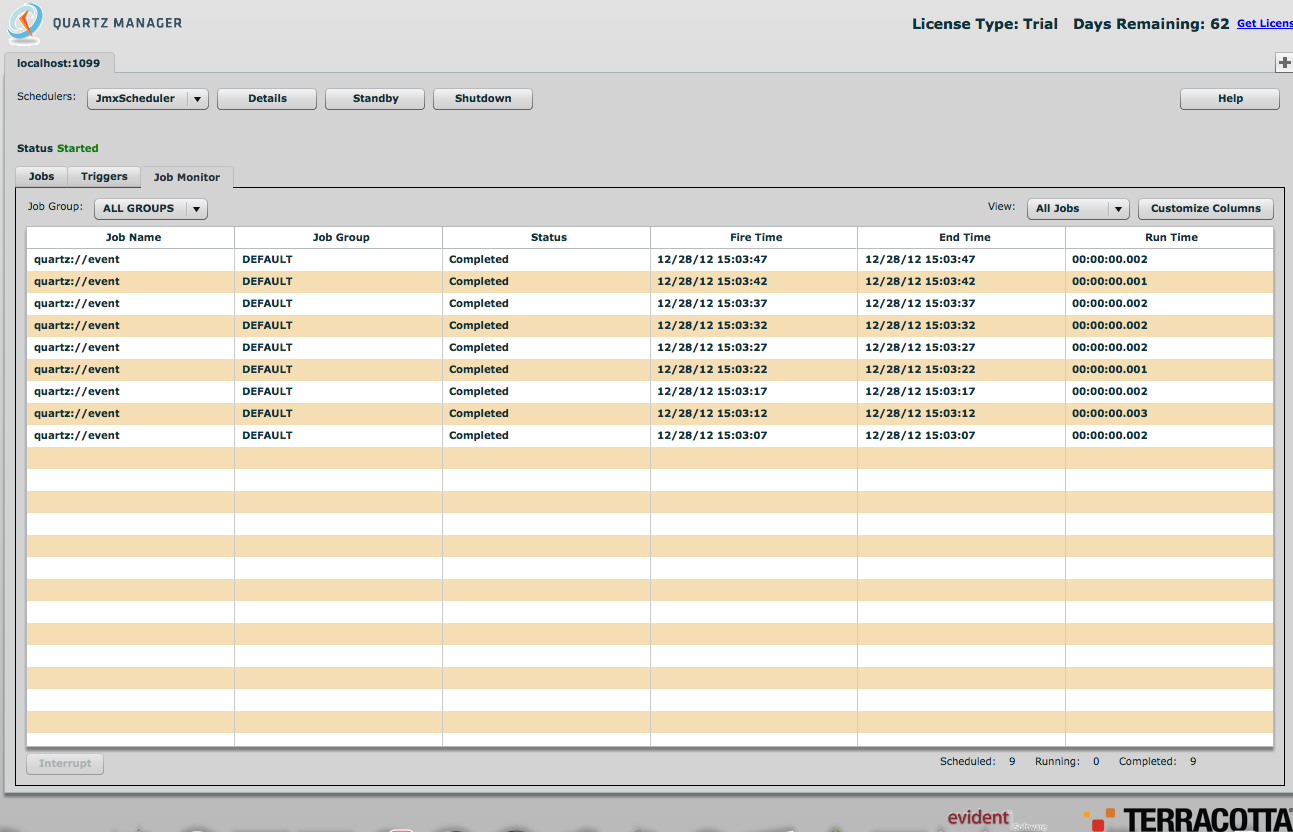
After successfully connecting to the remote Quartz scheduler, Quartz manager display the following job details page,

Click on "Triggers" to show trigger details.


Click on "Job Monitor" to see the detailed status for each executed job.


Thursday, December 27, 2012

Schedule Jobs using Mule Studio and Quartz, part II

In the previous blog, we discuss how to use inbound Quartz end point to trigger jobs. In this blog, we discuss how to use outbound Quartz end point to schedule jobs when some external events happen.

Below is the sample Mule flow. When someone accesses the HTTP end point, a message is put on a VM end point, which triggers Quartz Scheduler to run a job that put a message on a different VM end point, which gets picked up by Java transformer that will process it eventually.


 Pay attention to the key difference between this flow and the inbound end point flow. In the inbound end point flow, there is no message following into the inbound end point. For the outbound event, a message (VM or JMS) is necessary to trigger the job.

Double click on the outbound end point and the following window shows up,


Fill in the necessary scheduling information and click on plus sign to add a new job.


Make sure we select "quartz:schedule-dispatch-job".


Make sure "Group Name:", "Job Group Name:", and "Address:" are not filled in at all. If they are filled in, one will get some weird error that can't be made any sense of. I wish Mule Studio can be more helpful but it doesn't. I finally resolved this issue after spending hours searching and googling.

That's it. Now execute the flow and access the HTTP end point. You will see our Java transformer gets executed twice after initial delay of 15 seconds.

Schedule Jobs using Mule Studio and Quartz, Part I

There are a lot of confusions in how to use Quartz to schedule jobs inside Mule Studio. The documentation is slim to none.
In this series of blogs, we attempt to explain and show how to use Quartz to schedule both inbound and outbound jobs, and how to enable Mule Quartz connector so we can use Quartz manager to monitor jobs.

For Mule's reference, "The Quartz transport provides support for scheduling events and for triggering new events. An inbound quartz endpoint can be used to trigger inbound events that can be repeated, such as every second. Outbound quartz endpoints can be used to schedule an existing event to fire at a later date. Users can create schedules using cron expressions, and events can be persisted in a database."

An inbound quartz endpoint is used when we need to trigger inbound events periodically, like generating a predefined message, or loading a file, and then pass the generated message down the flow, either directly or through a VM or JMS.

An outbound quartz endpoint is used when we need to trigger an event based on incoming events. For example, in our world, we want to send all users a 25% off coupon everyday at 9am, for all the users who click on the welcome link embedded in our email campaign for the previous day.

The key difference between the inbound and outbound endpoint is that inbound message is scheduled entirely by Quartz, while the outbound endpoint is scheduled by Quartz, but only after an incoming event has been triggered. We will use some examples to illustrate the key differences.

Quartz Connector

But before we dive into the nitty gritty details, we need to create a Mule Quartz connector first. A Mule Quartz connector is how a Quartz schedule should be created by Mule.

Here is a sample scheduler using RAMJobStore. Enter the following block of xml in Mule flow's configuration XML section.
   <quartz:connector name="quartzConnector_vm" validateConnections="true" doc:name="Quartz">  
     <quartz:factory-property key="org.quartz.scheduler.instanceName" value="MuleScheduler1"/>  
     <quartz:factory-property key="org.quartz.threadPool.class" value="org.quartz.simpl.SimpleThreadPool"/>  
     <quartz:factory-property key="org.quartz.threadPool.threadCount" value="3"/>  
     <quartz:factory-property key="org.quartz.scheduler.rmi.proxy" value="false"/>  
     <quartz:factory-property key="org.quartz.scheduler.rmi.export" value="false"/>  
     <quartz:factory-property key="org.quartz.jobStore.class" value="org.quartz.simpl.RAMJobStore"/>  
   </quartz:connector>  

Mule uses "quartz:factory-property" to specify all Quartz related properties.

Here is how to configure a clustered scheduler using a JDBCJobStore using MySQL. Enter the following block of xml in Mule flow's configuration XML section.

      <quartz:connector name="quartzConnector_vm"  
           validateConnections="true" doc:name="Quartz">  
           <quartz:factory-property key="org.quartz.scheduler.instanceName"  
                value="JmxScheduler" />  
           <quartz:factory-property key="org.quartz.scheduler.instanceId"  
                value="_CLUSTERED" />  
           <quartz:factory-property key="org.quartz.jobStore.isClustered" value="true" />  
           <quartz:factory-property key="org.quartz.scheduler.jobFactory.class"  
                value="org.quartz.simpl.SimpleJobFactory" />  
           <quartz:factory-property key="org.quartz.threadPool.class"  
                value="org.quartz.simpl.SimpleThreadPool" />  
           <quartz:factory-property key="org.quartz.threadPool.threadCount"  
                value="3" />  
           <quartz:factory-property key="org.quartz.scheduler.rmi.proxy"  
                value="false" />  
           <quartz:factory-property key="org.quartz.scheduler.rmi.export"  
                value="false" />  
           <!-- JDBC JOB STORE -->  
           <quartz:factory-property key="org.quartz.jobStore.class"  
                value="org.quartz.impl.jdbcjobstore.JobStoreTX" />  
           <quartz:factory-property key="org.quartz.jobStore.driverDelegateClass"  
                value="org.quartz.impl.jdbcjobstore.StdJDBCDelegate" />  
           <quartz:factory-property key="org.quartz.jobStore.dataSource"  
                value="quartzDataSource" />  
           <quartz:factory-property key="org.quartz.jobStore.tablePrefix"  
                value="QRTZ_" />  
           <!-- MYSQL Data Source -->  
           <quartz:factory-property  
                key="org.quartz.dataSource.quartzDataSource.driver" value="com.mysql.jdbc.Driver" />  
           <quartz:factory-property key="org.quartz.dataSource.quartzDataSource.URL"  
                value="jdbc:mysql://localhost:3306/quartz2" />  
           <quartz:factory-property key="org.quartz.dataSource.quartzDataSource.user"  
                value="root" />  
           <quartz:factory-property  
                key="org.quartz.dataSource.quartzDataSource.password" value="root" />  
           <quartz:factory-property  
                key="org.quartz.dataSource.quartzDataSource.maxConnections" value="8" />  
           <!-- JMX Enable -->  
           <quartz:factory-property key="org.quartz.scheduler.jmx.export"  
                value="true" />  
           <quartz:factory-property key="org.quartz.scheduler.jmx.objectName"  
                value="quartz:type=QuartzScheduler,name=JmxScheduler,instanceId=NONE_CLUSTERED" />  
      </quartz:connector>  

To verify that the Quartz connector has been configured successfully, go the "Global Elements" in the Mule flow.


Click on Quartz.


Click on "Properties" tab,

Verify all Quartz properties have been properly configured.

Use Inbound Quartz End Point

An inbound quartz end point is self-triggered and will generate one or more messages, whose payload can be preconfigured or reloaded from a file.

Here is the picture of the sample Mule Flow. Every 5 seconds, Quartz end point will generate a VM message containing "HELLO!' as its body. We have a Java transform that listens to the same VM end point and processes the generated "HELLO!" message.


Double click on "Quartz_Event_Generator" and it brings up the Quartz Mule component,


Fill in the desired information so that our job will fire every five seconds. Now we need to add a new job. Click on plus sign.


Select "quartz:event-generator-job" and click on "Next".

Fill in "Group Name", "Job Group Name", and enter "HELLO!" for Text. We can also click on "..." next to File to load the file as the message payload.

Now we need to select our already defined quartz connector by clicking on the "References" tag on the Quartz component and select the appropriate pre-defined quartz connector from the drop down list for "Connector Reference:" field.


Now we can run our Mule to verify that Quartz will trigger a message very five seconds and the message will be processed by our Java transformer.

We will discuss Quartz outbound events in the next blog.